Author Archive: ken

Canon 5D MkIII Dynamic Range

Last week someone was asking about the dynamic range of the camera that has become my mainstay, the Canon 5D MkIII. We had been discussing the advantages and disadvantages of going to a medium format camera. One of the selling points of medium format is a cleaner image with greater dynamic range.

This got me thinking about how wide a dynamic range the Canon has in a real world test. According to several websites the total range is about 12 stops at ISO 50. You can find lots of graphs and charts, but (me being a visual person) I wanted to see what that really meant. I didn’t want to spend huge amounts of time on it, so I came up with a simple test. I used three pieces of paper, one black, one white, and one thunder gray. You might ask, why thunder gray? Because I have tons of it around the studio. Nothing scientific here. 🙂

I then taped them to a piece of cardboard and clamped them to a boom. See below.

thesetup

The next part was real easy. I just photographed the test strips and bracketed my aperture my full f/stops. I was shooting with Canon 50mm f/1.2. I also was shooting at an ISO of 160. Below is compilation of the images. It appears (on a calibrated monitor) that the overall dynamic range was greater than the range of the lens. So that makes it more than stops.

test_strip_600

I guess the conclusion I draw from this is that the Canon 5D MkIII has a useful dynamic range of more that 5 stops. You can differential all three test strips (black, white, and gray) from f/3.5 to f/16 in this example. That’s pretty impressive.

Again, I realize this is far from a scientific analysis, but it shows how good the sensor is in resolving darkness and light. Below is photo taken the other morning down a hallway of my house. I think it helps illustrate how well the camera does it’s job.

hallway

That’s it for now. Thanks for reading and be sure to check out other parts of my website such as my personal projects page – Personal Projects.

Beauty is where you find it.

I do a fair amount of industrial photography. While not glamorous, it can certainly be challenging and fun. Often it’s photographing CNC machines and machining pods and other tools used to make stuff. Sometimes the equipment must be lit to make it look as good as possible. Other times, available light is really best.

Once in while I get to shoot some pretty cool technology. Last week, I got to shoot a laser cutter. It’s truly amazing to watch a beam of light cut thru a half inch piece of stainless steel. It’s also tough to photograph. The problem is that you want to see sparks that are generated from the laser and to do that, you need to use a slow shutter speed. The problem is that the laser’s cutting head is constantly moving (which causes it to blur just like the sparks). The trick is to be able to pan with the cutting head’s movement and to time the shot just right. Below is one of favorite shots from that shoot.

Laser Cutter

Laser Cutter

Well that’s it for this week. Next week I’ll post another composite image I’ve been working on. Thanks for reading!

-Ken

A new composite image

I’ve been working on a few new composite images and the first one is more or less complete. I usually will continue to make changes and tweaks on images as I see things I want to change or in some instances, after I look at an image I change my mind how it should look.

In case you are wondering what a composite image is, it is an image that is made up of lots of other images. However it’s not a collage because the composite creates a different reality. In many instances good composite images are not recognizable as such.

The image below is made up of more than 30 images composited together to make the scene. I always shoot every image in my composites instead of using any stock photography. It just gives me more control over the final image and doesn’t cause any copyright issues.

Gabrielle's Gun.

Gabrielle’s Gun.

It’s hard to see the detail, sadly my blog software restricts the maximum picture width I can publish. Also if you want to see more of my composite images visit my personal project section of my website – Personal Projects

Once again, thanks for reading!

-Ken

Video

OK, I recently updated the version of WordPress on my website and it should now allow me to embed video into the blog. So this is a test to see how well it works. So here it goes…

I just watched to preview and it seems to work.

(FYI, the video was previously published on Vimeo here.

In future blog posts I may start including video to help explain procedures, techniques, or reviews.

I guess you have to hail your victories no matter how small they are. 🙂

Thanks for reading.

-Ken

Some Observations about Lighting Modifiers

This week we are going to discuss a few things about lighting modifiers. With very few exceptions, lighting modifiers do just 2 basic things. They change the size and the shape of a light source. That’s really all they do. The differences between modifiers is how they achieve those two properties.

This week we are going to compare two modifiers of very similar size. One is a 35 inch Octobox with a grid and the other is 36 white umbrella.

35 inch Octobox vs. 36 inch Umbrella

35 inch Octobox vs. 36 inch Umbrella

The mechanical difference between these two modifiers is that the umbrella bounces the light from the flash head to the subject to obtain diffusion, where as the octobox mounts directly on the light and uses a diffusion panel to dissipate the light. The grid on the panel helps prevent spill (keeps more light in the general direction of the subject). Below is a photo of them mounted on a light.

Umbrella and Octobox

Umbrella and Octobox

From what we know about basic light theory, the effective size of a light source determines the harshness or softness of the light. A larger light source produces a softer shadows and a small light source produces harsher shadows. Following that, these two modifiers should produce the shadow characteristics. Let’s take a look as see how that pans out.

This first photo was shot with the umbrella.

umbrella1

Umbrella


One obvious thing we notice about about this photo is the shadow. Most of it is uniform with feathering occurring  at the outside edges.

Octobox

Octobox

Now look at the photo above that was shot using the octobox. The shadow looks quite different. It is much denser at the center with a larger area that is feathered. Why would these two lighting modifiers of equal size produce such different shadow characteristics?

The explanation can be seen when we step back and look at the overall set. The photo below is a photo of the set from across the room showing the light pattern produced by the umbrella.

Umbrella

Umbrella

Because the umbrella creates lots of spill, light is blasted all over the studio. We can see that light actually escapes through the back of the umbrella.

Octobox

Octobox

The octobox has a much more defined light throw. The grid helps confine the light even more and makes it even more directional. (Notice that no light escapes from the back of the modifier).

Ok, so how does this explain the difference in the quality of the shadows? One word: bounce. Because the umbrella sprayed light all over the studio much of bounced back to the subject and softened the shadow. If this was shot in a large open field or in a large studio the effects of bounce would not be seen and the shadow characteristics would be nearly the same.

A side lesson to be learned from this experiment is that, if you are used to the performance of a certain modifier in your studio, when shooting on location you may experience different results. Remember that your environment can affect the quality of your light.

An FYI: if you look at the photos of studio, you’ll notice that ceiling panels are painted flat black. This was done to help reduce bounce and to keep control of the quality of shadows.

That’s it for this week. Thanks for reading.

-Ken

Six Years of Blogging

I started this blog in 2008 with the intent of updating it every week. Well, that didn’t happen. Coming up with something new and interesting over six years is pretty difficult. At best count, this is my 245th posting to this blog. That may not seem like a large number but for me it has been a struggle. A happy struggle.

That said, I’m ready to try for another 245 posts, if you are willing to stick it out with me. I have some ideas for new posts that may be a little more educational in nature. Plus, I’ve update the blog software on my server, so hopefully that will help. I’m on a search for software so I update my website. So far, I installed Joomla and played with it a little. I think it is overly complex for what I an wanting to do. But hand coding using HTML and Javascript is too cumbersome. In the next couple of weeks I hope to have a solution and will be working on the site.

Once a again, thanks for reading!!

-Ken

The difference between studio strobes and speedlites.

This week we are going to talk about some very basic differences between studio strobes versus speedlites. First of all, lets start off by discussing what a studio strobe is and what a speedlite is. Studio strobes typically run on AC power or have a battery pack that runs on or is recharged using AC power. They are designed to be mounted on light stands and will accept a variety of modifiers. Battery powered, small flash units that are designed to be mounted on a camera, I going to refer to as speedlites. Actually, Canon calls their flash units Speedlites and Nikon calls theirs Speedlights. Other companies have their own names for their models, but essentially they work the same. Many speedlites will also run on AC power, but they are really designed for DC battery power.

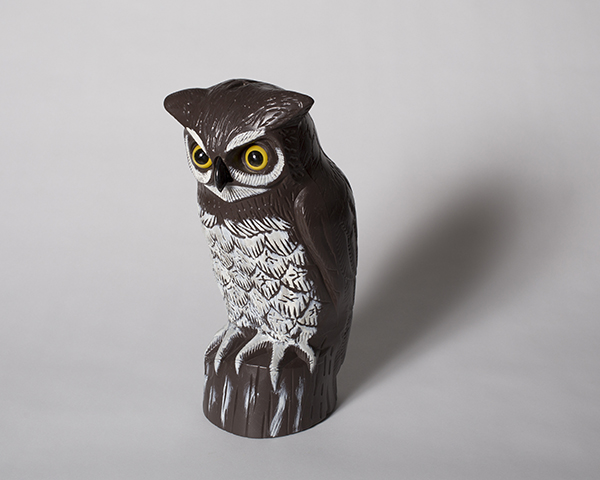
Let’s look at the way a studio strobe looks and works. Below is a common studio strobe.

Studio Strobe

Studio strobes come in a variety of shapes and sizes and each brand has their own design, but for the most part they work the same way. Some are just a flash head (flash tube and modeling light) and the power supply and controls reside on another unit connected by a cord. The strobe pictured above is called a monolight, because everything is contained in one unit. Studio strobes typically have two lights on them. One is a modeling light and the other is the actual flash tube. The modeling light attempts to give you a representative view of what the light is going to look like when flash tube discharges. The flash tube itself creates the real light. The power output of a studio strobe is variable and the the degree of variability is dependent on the brand and model of the light. Studio strobes have brackets that allow them to be mounted on standard light stands.

The photo below is of a speedlite.

Speedlite.

The speedlite is considerable smaller than a studio strobe. You will notice that there is no large reflector and there is no modeling light on a speedlite. It’s flash tube is a small and, instead of circular, it’s straight. Although they can be mounted to light stands using an adapter, speedlites are designed to be mounted to your camera’s hot shoe. Speedlites usually have two types of power settings. There is a manual setting that allows you to control the flash’s output and there is usually an automatic feature. On the automatic setting (and if you are using a compatible camera) the flash and the camera communicate with each other. Based on the camera’s settings, the flash knows how much light it needs to produce to get the proper exposure.

OK, so now you may be wondering how they are differ in use. Studio strobes can be used on location with portable battery packs or using a small generator, as well as used in the studio. Because they are considerably more powerful than speedlites, they can create cool effects when used outdoors. Since they are made to be used with modifiers (umbrellas, grids, soft boxes, PLMs, etc.) you can easily change the quality and shape of the light. The downside is that they are more cumbersome and are not easily portable. If used outdoors (and especially with large modifiers), they often need to be sandbagged in windy conditions or they will be blown over.

Speedlites, on the other hand, are lightweight, small, and easy to handle. Because they are not as powerful they don’t have the reach of studio strobes. They cycle faster so you can be ready shoot another photo more quickly. Because of their size and power output they don’t work as well with modifiers. But for event photography (weddings, parties, conferences, etc) they excel beyond what you can do with studio strobes. They work well for most any dynamic environment where light stands and studio strobes are just not practical.

WARNING TECHNO-GEEK SPEAK: There is also a difference between studio strobes and speedlites that usually doesn’t get mentioned. It’s kinda technical, so bear with me. At their most elemental, all flash units work the same way. They take power from a source (AC power or a battery) store/accumuate it in an electronic component called a capacitor. When you hit the shutter, the electricity flows from the capacitor to the flash tube and you get that bright light flash and that pop noise. But there a difference between how studio strobes and speedlites achieve their variable output. Understanding this can allow you to do some neat things.

Studio strobes achieve their variable power setting changing the amount of electricity stored in the capacitor. For instance, the flash unit at half power stores half the electricity than it stores at full power. So, what can happen is this: if your turn on your studio strobe and set the power to full, the capacitor stores the maximum amount of electricity. Now, lets say you turn the power to half power before you discharge the light. The capacitor still has the full charge so if you take a photo and your camera is set to properly expose a photo at half power, you will get an over-exposed image. Some studio strobe makers have found a way to drain power from capacitor when you reduce power. Otherwise, its a good idea discharge your studio strobe whenever you reduce the power.

Speedlites work differently. They are designed to conserve battery power and to be able to cycle quicker. The way they work is to fully charge the capacitor all the time. So how do they have variable output? They change the duration of the flash itself. So, at full power, the flash duration may be 1/4000 of a second. When you set it to half power, the flash duration changes to 1/8000 of second. This means that lower power settings, the speedlite can recycle and be ready to shoot again very quickly. (These flash durations are for example only and will change or be different depending on the brand and model of your speedlite).

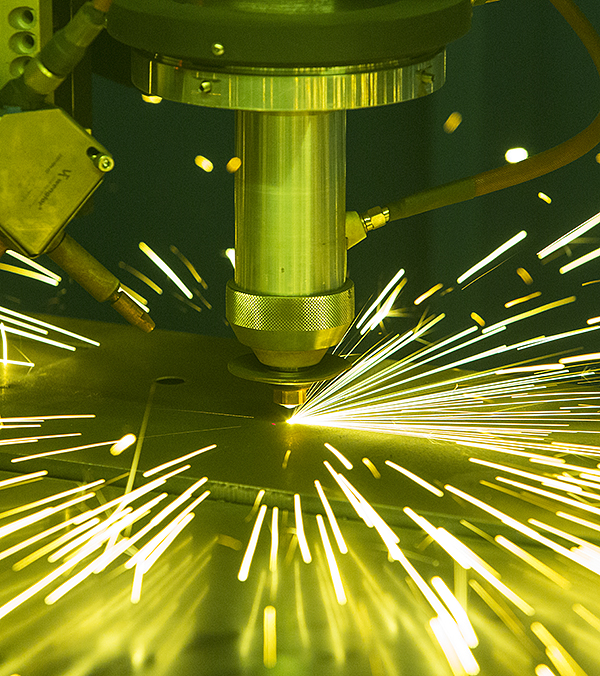
There’s also and other “side effect” to this behavior. It means that in a dark environment, you can create some neat effects. With such a short duration you have the effect of using an extremely high shutter speed, even if you never exceed your maximum sync speed. For instance, the photo below is of a soap bubble popping on the tip of a wood screw.

High speed flash.

If you feel like experimenting, you can create some fascinating photos playing with this technique.

Well, I got long winded this week. If you finished reading this, thanks for sticking with it and I hoped you learned something.

-Ken

Canon 600mm F/4 IS. An informal test.

OK, last week a friend of mine, Joe, brought in his Canon 600mm lens for some informal tests. Joe is a wildlife photographer and testing the lens in the field is difficult because of changing light conditions, moving subject matter, and other factors that effect consistency. I jumped at the change to spend a couple of hours playing with the lens in the studio.

First of all the lens is heavy. I mean REALLY heavy. Shooting it handheld isn’t really a good option. It is really well made and very robust. If you were in the woods and a bear attacked you, you could use it successfully to defend yourself. The price tag on a new 600mm is nearly $13,000, so it’s pretty pricey.

Here is what it looks like attached to my Canon 5D Mk III and battery grip. (More accurately it feels more like the camera attaches to the lens. ) 😉

Canon 600mm f/4 IS lens

One of the goals of our informal test was to see how sharp the lens was wide open in opposed to shooting it at a smaller aperture. The tests were far from scientific, but I think they indicate how ridiculously sharp this lens is under all conditions. This first shot is taken with the lens at f/4 at 160th of second at ISO 160.

600mm f/4

This next shot is at f/14. There is no noticeable difference in sharpness at the focus point (the dinosaur’s eye). The depth of field is really different, as you would expect, but the sharpness is the same as f/4.

600mm f/14

Here is close up of the photo shot at f/4.

600mm f/4

Here is a close of the photo shot at f/14. DOF is the only real difference.

600mm f/14

It’s amazing that a lens that big can be so sharp. When you pay that much for a lens, there’s a reason for it.

We did one more test to see how well the lens performed with a 1.4x teleconverter. The teleconverter caused the lens to lose a stop on the wide end and became a 840mm f/5.6 lens. Shooting it wide open caused a very slight degradation in image quality and sharpness, but still very respectable and very useable. However, the degradation disappeared as we stopped the lens down.

My overall impression of lens is overwhelmingly positive. It’s big, heavy, and expensive, but I don’t see how another lens could perform any better. This lens is scalpel sharp and it focuses so fast it’s scary. If I was a sports shooter or wildlife photographer, this lens would definitely be on the top of my wish list. Two thumbs up.

Thanks for reading!

-Ken

Well it’s been a while…

… And I’m finally posting something to my blog. I recently did an unusual shoot. The project was for an ad agency and their client that makes huge industrial castors. This things are beasts and built to handle thousands of pounds each. The project was to shoot 12 images from different angles of a particular castor so they can be used on the company’s website. It will be animated so that you can click on the image and be able to rotate it so you can see it from 12 different angles.

This is more difficult when you have to make sure your angles are accurate and lighting is consistent from one image to the next. Here’s the way we solved the problems. First we marked where the castor would be suspended by a boom by monofilament line. Then around that point we marked each of the camera angles we needed (it took a little geometry, some string, and some gaffers tape).

The setup to shoot the 360 of the castor.

As we moved the camera from one point to another, we moved the lighting and a white card used for the background correspondingly. Each of the images will be outlined before they are given to the web developers to animate.

I shoot a lot of industrial photography and one thing I learned early on is that not things given to me to photograph are not often pretty. The reason being, a lot of these products are made to be durable and function under extreme conditions. Most of the time they are not made to be aesthetically pleasing. So when this castor came in, it wasn’t looking at it’s best. In most cases with agencies or companies with larger marketing departments, I don’t retouch the images. They have graphic designers that do that. The only time I retouch is when I am working for the company manufactured the product or I am asked to. (Photos of people are very different and I don’t let anyone else retouch those).

So, for the purpose of the blog, I retouched one of the photos so you can see an example of a before and after. Here is the before:

Before Retouching

And here is the after shot:

After Retouching

Now I could have gone overboard and done more retouching, but since this was for the blog and not a client, I wasn’t inclined to spend a lot of time on it. The amount of time spent retouching depends on the amount of work that needs to be done and how much the client wants done and is willing to pay for. It’s another reason why I try to impress upon my clients that it’s in their best interest to provide the best possible examples of their products that they can. It makes my job easier and saves them money.

Well that’s it for now.

Thanks for reading!!

-Ken

Is learning to shoot film really needed in school?

On some photography boards this topic is rearing it’s ugly head again. It seems that topic keeps coming up every so often.

Here’s the basic question: should a school require a student to learn to shoot film (with a manual camera) and process the images as part of a Photography Degree?

Here is one side of the coin. In the real world what are the chances that someone will work with film rather than shoot digital? Unless you are working on certain fine art projects, the chances are quite remote. The quality of digital is so good now, it has effectively eliminated film in nearly all applications. Learning to shoot/process film wastes a student’s time and money that could be used to learn something more productive.

Here’s the other side. Learning to shoot film teaches you certain basic skills that are difficult to learn when shooting digital. For instance, when you shoot with a manual camera (one where you have to set the ISO, shutter speed, and aperture manually) you are forced to learn the relationship between settings and how they impact the quality of your images. Also, shooting film requires you to invest your time in creating an image. Since you only have a limited number of exposures on a roll of film and film costs money, you have to take your time to make sure your composition, lighting, and exposure is set correctly before you take your first picture. This requires you to think and rethink about what you are doing. Working in a darkroom can teach you the basics of what Photoshop does. Most of the tools and filters in Photoshop are based on real world darkroom techniques. In the darkroom you have to be purposeful of what you are doing because you aren’t just pushing sliders around to see what happens, your actions have mostly irreversible consequences. Again, it forces you to be more thoughtful.

Now you’ve heard the arguments, what is the right answer? I don’t think there is a simple right answer. Learning to shoot film is a valuable education for anyone aspiring to be a better photographer. However, you can learn the craft having never touched a film camera.

Be sure to check out some of my personal projects here.

Thanks again for reading!!

-Ken

Loading...
X