Author Archive: ken

Facebook

Just for fun, I added a new album to my Facebook page entitled “Every Day Life”. The album is going to contain photos that are mostly snapshots of the things and places we see every day, but often are taken for granted or over looked.

I guess it’s just another way for me to keep a fresh perspective and see thing a little differently. You can see the album here. While you are there, please be sure to “like” my Facebook page. 🙂

Thanks for reading!

-Ken.

Killing some time

There is a delay on a location shoot so I am finding that I have a little time to kill. There’s really nothing I can do for about 30 minutes so I thought I’d post an image from a previous location shoot.

Image © Ken Rieves

Gage. ©Ken Rieves. Leica M and Summicron 50mm.

I love the natural light coming in thru a large overhead door.

And here is a shot of a product shot.

Camera Back. © Ken RIeves. Leica M + Summicron 50mm.

Camera Back. © Ken RIeves. Leica M + Summicron 50mm.

Thanks for reading and be sure to check out my Facebook page.

-Ken

How you see the world matters.

Sometimes it’s refreshing to have a change of perspective. It makes old things seem new because you see them differently. As a photographer, it is sometimes difficult to find a new way to look at the world and re-introduce creativity into your work.

If you’ve read this blog the last couple of weeks, you’ve been bored ad nauseam with my praise for my new Leica M camera. It is a rangefinder camera. So it uses a technology that is almost 100 years old for the photographer to manually focus the camera. (What is a rangefinder camera? Click here.)

So, what’s the inspirational difference between shooting with DSLR and a rangefinder?

The viewfinder.

When using a DSLR you are looking thru a lens and when using a rangefinder, you are looking thru a window.

I know that sounds kinda goofy, but it’s true. Sometimes inspiration, motivation, and a fresh perspective can come from unexpected places. When you find them, embrace those places and visit them frequently.

Tarragon. © Ken Rieves

Tarragon. © Ken Rieves

Thanks for reading.

-Ken.

More photos with the Leica.

Now that I’ve spent some time shooting with the Leica M, I’m very happy with the camera. I’m also very happy with the Leica Lenses. They are well made and amazingly sharp. They pair up so well with the M.

Since last weekend was Memorial Day weekend and we had to be around the house a lot (nursing a sick puppy back to health), I shot several photos around the yard.

Pergola Shadows

Pergola Shadows

Lake

Lake

Both of these were shot with the Leica Summicron 35mm. Normally, I’d consider a 35mm to be a wide angle lens, but for some reason it really seems to suit the Leica. I know that doesn’t make sense, but I find it is true nonetheless. Perhaps I like it because there is no distortion that you normally see at that focal length. The lens is just so clean and sharp. If you are interested in more information about Leica’s cameras and lenses, a good resource is Ken Rockwell’s website. Here is his review specifically about the 35mm Summicron.

Also, if you arrived here via Google, be sure to check out the rest of my website and photos here.

Thanks for reading!

-Ken

Leica M. A couple of days later…

I’ve had a few days now to play with the Leica M and the Summicron 50mm lens. I have to say, the more I use it, the more I love it. In all honesty, I’ve been spoiled by my Canon 5D MkIII auto focus. Going back to manual focus is a bit of an adjustment, but well worth re-learning an old skill. The camera is built so well and feels so good to hold and use, it makes me wish I’d have bought a Leica instead of my first car. 🙂

I’m still experimenting with testing image quality, but from what I can tell, with limited experience so far, it is better than any camera I’ve owned. That said, I can’t really distinguish whether this is due to the quality of sensor or the quality of the lens. The Summicron 50mm f/2 is arguably one of the best lenses made. For comparison, I have the Canon 50mm f/1.2, which is a fine lens. But I don’t know if it is in the same league as he Leica.

The Leica and the Canon, are totally different cameras and are built to perform completely different functions. The Canon is a workhorse. It’s my daily bread and butter camera. It has never failed to deliver. With the right selection of lenses and the skill, you can create stunning images on a consistent basis. If I had to pick one camera to use to make a living, it would be the Canon 5D MkIII because of the image and build quality, lens selection, and the versatility.

The Leica, on the other hand, is the camera that explains why you fell in love with photography. It creates stunning images and is extremely simple to use. You select your ISO, use the meter to determine shutter speed and aperture, focus the lens, then take a picture. It’s small, it’s quiet, and it’s unobtrusive. You can carry it around and no one notices you. It can easily become a part of who you are, as if it’s a part of your wardrobe.

So, I’m going to avoid all the tech talk and speak more from my heart. I am really pleased with the performance of the Leica. However, it is not a camera for everyone. If you unaccustomed to using a manual camera, you may not like it. It takes more work and a little more thought to use, but the effort is worth it. Using the camera is overall a satisfying experience. If you are someone that is love with photography, in love with creating images that satisfy you, in love with the experience of capturing a moment in time, then you may just love this camera. The camera is expensive though, and some people will are argue that it’s not worth the money. But in my opinion, it’s worth every penny.

At photo at a local coffee shop.

Friday Afternoon. Copyright Ken Rieves Photography.

Friday Afternoon. Copyright Ken Rieves Photography.

Next week I’ll post some image comparisons between the Canon 50mm f/1.2 and the Leica Summicron 50mm f/2.

Once a again, thanks for reading!

-Ken.

Leica M – First glance

Today my new Leica M and a Leica Summicron 50mm F/2 lens arrived. While I’ve only had the camera for a few hours I’m really impressed with the build quality of the camera body and the lens. My daily camera is a Canon 5D MkIII (with a variety of Canon “L” Lenses), so I’m used to working with good camera gear. The Leica body and lenses takes quality to another level.

Now, after heaping all that praise on the camera and lens, I really haven’t had much time to shoot it yet. The photos I have taken seem to be amazingly sharp with great contrast.

Here is a sample snapshot taken in my studio’s lobby. As I gain some experience with the camera in the next few days, I’ll post more photos and give you more of my impressions.

kuerig_small

I’m not really climbing a learning curve with a manual focus camera. Instead I’m having to re-learn skills that I have forgotten.

Thanks for reading!

-Ken

*** Edit ***

Since I posted this, I shot another image that helps highlight what the lens and camera can do.

wood_fruit_small

More about Black and White Photography

Last week I posted a blog entry about shooting photos with the sole intent of converting them into black and white photos. (You should be able to scroll down to see that post, if not, you can find it here ). In that article, I discuss using a little advance planning in creating a black and white image, in opposed to just simply converting color images to black and white.

Below is a photo I shot that relates to this topic. In planning this photo, I had the sole intention of it being a black and white image. When I was prepping the makeup artist (the awesome Kristy Jahn) I told her I was concerned with lightness and darkness and not with color. I also told that I was looking for a retro makeup scheme reminiscent of the 1940s. I think she did a fantastic job. The Model (Peyton Drew) had this fabulous dress that was the inspiration for the shoot. It was beaded in black with gold bead detail around the collar and shoulders. So when I selected a fabric to cover the bench she was sitting on, I wanted something that offered enough contrast to differentiate the dress from the fabric. The key was to not provide too much contrast as to be a distraction. I used a piece of red fantasy cloth (fantasy cloth is semi-opaque gauss-like material). Since the image was black and white, I wasn’t concerned with the color, only how it appeared as a shade of gray. As it turned out the fabric looked much like crushed velvet, which worked well for the mood of the photo.

Photo Copyright Ken Rieves Photography

Photo Copyright Ken Rieves Photography

I chose to use a lighting scheme that was more common in the 1940s, but instead of using spot lights with fresnel lenses, I used strobes with honeycomb grids. This allowed me to use very directional lighting, but created softer shadow characteristics. The softer shadows gives the photo a more contemporary look, but stills pays tribute to vintage glamour lighting. As a whole, I think it worked out well.

Thanks for reading and I should have another post ready later this week.

Don’t forget to also visit/like my photography page on Facebook.

-Ken.

Black and White? Yes please!

I admit it. I have a passion for black and white photography. I think it started while in my teens. My uncle gave my brother and I his old darkroom equipment and we converted an empty room at my father’s office into a darkroom. A lifelong passion was ignited. I learned to develop film and make prints by reading books and by trial and error. Shooting film and processing it teaches you patience and you remember and learn from your mistakes.

Fast forward to today. I still love and appreciate a good black and white photo. I don’t really care if it was produced digitally or from film as long as the quality is there. Sadly some people think that a good black and white photo can be produced by simply converting a color photo to grayscale. To me, that’s like saying an out of focus photo can be corrected by sharpening it.

All of the elements of any good image must be present in a good black and white photo. You must have a interesting subject, you must have good composition, the lighting must be right, and you need a tonal range that is appropriate for the image. I think most people easily understand the first 3 criteria but the last one is easy to overlook and is directly related to the others. Tonal Range – The difference between the brightest and darkest value in an image and the shades of gray between the two.

So how do we control the tonal range? It starts before you hit the shutter release. You have to imagine how the photo will look in black and white. This is easier said than done. Colors can fool our eyes into thinking that, because colors are different, they will render differently in black and white. This may or may not be the case. Often different colors with similar brightness levels will only be subtly different in black and white. You must teach yourself to see in black and white in order to understand and anticipate how the final image will look.

When you look at a location at which to shoot a color photo, you must evaluate the entire scene. What colors are present? Where does the light fall? Where are the interesting textures? What point of view maximizes these factors? You have to do the same thing when shooting black and white, except you have to look at the tonal ranges (look for contrasts, textures, and different brightness levels) instead of just colors. Sometimes a location that is great for a color photo will not have the same impact in black and white. And the reverse is also true. A location that is perfect for a black and white photo, may be lacking elements for a good color photo. You must learn to see the difference.

Since most digital cameras shoot in color, most of us must convert our images to black and white. While a simple conversion is easy, it’s usually not the best option. Remember, while certain colors may look very different from one another to the human eye, they may look very similar when converted to black and white. The black and white conversion is crucial to creating a good black and white image. Every photo is different and so each conversion must take into consideration the original colors and how they must be altered in order to get correct tonal range. The techniques for converting color to black and white is well beyond the scope of this blog. There are tons of resources online and I encourage you to explore them and experiment with your images.

In the days of film, there were many different techniques for altering black and white images including the use of colored filters to change contrast, film selection, film processing methods and chemicals, printing techniques, and print processing chemicals and techniques. People were tweaking and altering black and white photos way before Photoshop was even contemplated.

Great black and white photography is a joy to behold. But it is easy to underestimate what techniques and effort goes into creating those images. I am in awe of photos that have deep blacks that still retain detail and have bright whites where textures are still visible and all the other colors are represented as unique shades of gray. It’s not as easy as it looks.

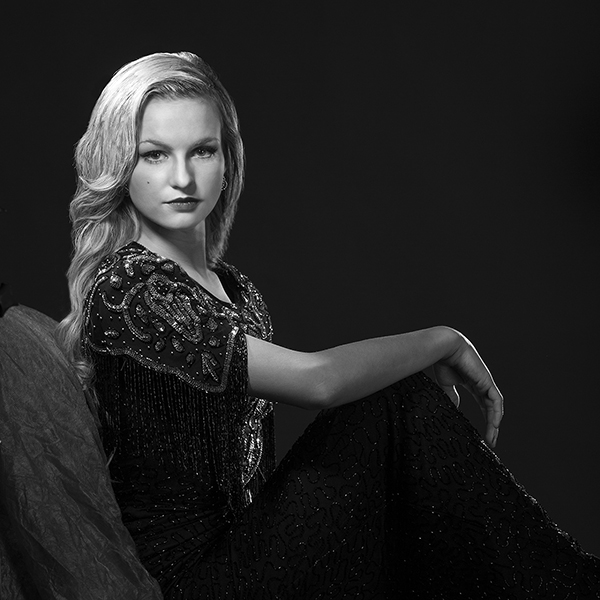
For instance, below is a wonderful photo by Robert Voltaire . It contains all the elements of a great black and white photo. The composition is amazing, the lighting and exposure are spot on. Notice that the white mesh material retains it’s texture and is differentiated from the background. At the same time, the model’s dark hair still retains detail. It’s a striking example of what to do right when creating a black and white photo.

Copyright Robert Voltaire (used with permission)

Copyright Robert Voltaire (used with permission)

Well that’s it for this week. Thanks for reading and a special thank you to Robert for letting me use his photo as an example.

Ken.

What are f/stops?

A couple of weeks ago I ran across an instance where I was talking with someone in a professional capacity and the topic was the exposure of an image. Unfortunately this person was not properly informed as to what an f/stop really was. Many people, especially those new to photography and DSLRs believe that the each increment of aperture on their camera is an f/stop. 99.9% of the time that is not true. Let me shed a little light on what is an f/stop.

First if all, I won’t go into detail about how aperture is calculated, just realize that basically it is the ratio between the focal length of the lens and the diameter of the aperture. (For a more detailed explanation check out this website – A Tedious Explanation of the f/stop). This ratio determines how much light the lens transmits to the sensor or film. You can get bogged down in all kinds of physics about light and lens theory, but in a nutshell that’s all you really need to know.

Here are the full f/stops – f/1, f/1.4, f/2, f/2.8, f/4, f/5.6, f/8, f/11, f/16, f/22, f/32, f/45, f/64.

Contrary to what you might think, the smaller the number, the larger the aperture. For instance, a lens at f/2.8 lets in more light than a lens set at f/16. Here’s an interesting thing about f/stops, when you go down in f/stops, the amount of light reaching the film/sensor drops by half. So, when you change the aperture from f/4 to f/5.6 the amount of light drops my half. By the same token, when you go from f/4 to f/5.6, you double the amount of light that this the film/sensor. Crazy huh?

So now you may be asking, “when I look at my camera, it shows more numbers than appear on your list of f/stops. Why?”. Well, most modern camera/lens combinations allow you tweak your exposure to a greater extent than full f/stops permits. In fact, most cameras allow you select the increment using either 1/3 or 1/2 of an f/stop. Using our example (f/4 to f/5.6) you may see f/4.5 and f/5 (if using 1/3 stops). As you would expect the more increments between full f/stops gives you more precision in regards to your exposure.

Ok, I hope this helps clear up some of the confusion about what f/stops are and how they are used.

Thanks for reading and take some time to explore the rest of my website and blog.

-Ken.

New Composite image

As you may know, I love doing composite images. They are a lot of work and require a lot of planning. All of the images in my composites contain only photos that I have taken. I don’t use any stock photography. This gives me a lot more control over the final images and prevents any copyright issues.

Here is one of most recent images. I may still do some tweaks to it, but for the most part it is complete.

gabby_base4b

I still want to add some additional graphical elements to the image, but that will take me some time to decide exactly what I want to add.

That’s it for this week. If you want to see more of my strange personal projects visit here. Thanks for reading!!

-Ken

Loading...
X